OUR SUPPLIERS
Every project is unique and requires a different approach. Working with variety of suppliers and manufacturers ensure that we deliver the best results.








Solida Coatings has been helping homeowners, builders, contractors, developers and property managers in Edmonton for many years with stucco eating birds and woodpecker holes repairs. It is our mission to provide best results for your building’s exterior cladding system. We offer our services for various stucco repair projects.
Woodpecker damage to stucco is more than an aesthetic problem; even small peck marks can expose substrate and allow water to penetrate, leading to rot, mold, and costly structural repairs if left unchecked. Solida Coatings is a stucco contractor offering woodpecker damage repairs for both residential and commercial properties. Solida Coatings takes on any size and kind of repair project with ease, using only top quality materials from reputable suppliers which helps provide better results for your project. Solida Coatings offers free estimates for stucco repair projects.

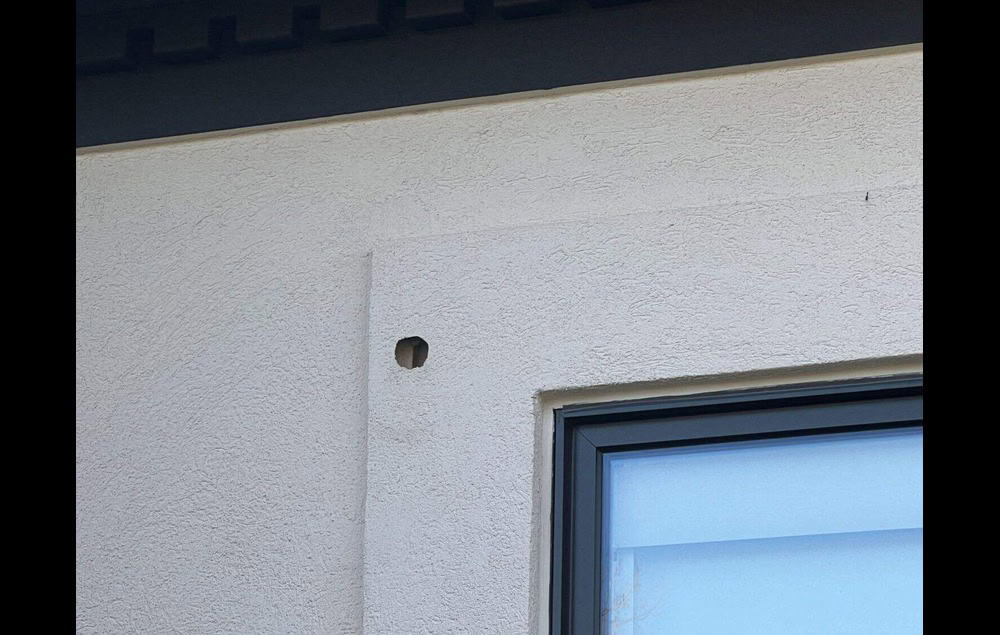
Woodpeckers tend to peck holes into EIFS (Exterior Insulation and Finish Systems) to get worms and bugs to eat and when they realize there aren’t any, they leave. They also peck holes into the stucco to build nests. Woodpeckers and other birds that do this are unusually known as stucco eating birds.
There might be multiple holes and if these damaged areas are left alone, it might even cause water damage, rotting the substrate such as plywood behind the stucco. These holes tend to be relatively easy to fix, which depend on where they are located since these birds are prone to peck holes under the soffit, meaning that the damaged areas are usually are in high places.
If there are multiple holes that are next to each other, we do recommend to apply the finishing to the entire section to revert back it’s aesthetics since the multiple patches next to each other would be unappealing. A couple patches here and there would conceal the damaged areas almost perfectly, however multiple holes would require a complete application of the acrylic finish coating after fixing the holes.
We can help with most types of stucco repair services. Contact us today if you have any questions and would like to get a quote.
Woodpecker stucco damage occurs when birds peck or drill into exterior stucco surfaces, creating holes that can expose sheathing and insulation to the elements. In Edmonton, homeowners face particular risk because local species such as the Northern Flicker exhibit seasonal drumming and foraging behaviors that target hollow or insect-infested wall cavities, especially on EIFS (synthetic stucco).
Woodpecker damage to stucco in Edmonton is driven by a combination of bird behavior and material cues that make exterior walls attractive targets. Birds search for insects, use resonant cavities for drumming and territorial displays, and sometimes excavate for nesting; EIFS and poorly supported trim amplify sound and create perceived cavities. Environmental triggers such as spring territoriality and insect emergence increase pecking frequency, while freeze-thaw cycles in Edmonton can create delamination that exposes softer substrates and insect access.
Understanding these causes helps prioritize inspection points and prevention strategies that address both biological attractors and material vulnerabilities.
The next subsections break down behavioral reasons and practical signs homeowners can use to diagnose woodpecker activity versus other exterior damage.
Woodpeckers target stucco because wall assemblies can conceal insects, produce a hollow sound that amplifies drumming, and occasionally present loose or softened materials that are easy to peck. In Edmonton, the Northern Flicker is known for ground-foraging but will drum on vertical surfaces when food is scarce or when establishing territory, increasing interactions with houses that have insect-laden sheathing. EIFS in particular acts as a resonator: the foam-backed boards and thin finish layers can sound hollow and signal a potential cavity, prompting investigative pecking. Homeowners noticing repeated small, round holes in a line or cluster should consider insect activity behind the wall and plan an inspection that checks both pests and substrate integrity.
Identifying woodpecker damage requires looking at hole shape, pattern, and underlying material response; woodpecker holes are typically round or rectangular chips in a clustered pattern rather than random cracks. On traditional cement stucco you may see coarse edges with underlying lath or sheathing exposed, whereas EIFS damage often reveals damaged insulation board, adhesive failure, or delamination beneath thin finishes. A tactile inspection will find soft or hollow-sounding areas that differ from hairline cracks caused by settling; moisture staining and insect frass behind holes indicate deeper issues. Documenting hole locations, sizes, and any seasonal timing supports contractor diagnostics and helps determine if insect mitigation is required before cosmetic repair.
Woodpecker holes are more than cosmetic: they create direct pathways for moisture, thermal bridging, and pest ingress that can compromise the building envelope if left unaddressed. Even small penetrations allow water to reach sheathing and insulation, accelerating rot and mold growth in the Edmonton freeze-thaw environment and reducing thermal performance. Over time, repeated damage can force larger repairs such as partial EIFS board replacement or reattachment of drainage planes, increasing cost and disruption. Homeowners should treat active pecking and any evidence of moisture or insulation wetting as issues that require prompt inspection and prioritized repair to avoid escalating structural and health risks.
Moisture intrusion through stucco holes enables water to reach wood framing and insulation, creating conditions favorable to mold and wood decay; in Alberta’s climate, freezing and thawing cycles worsen cracks and delamination. Wet insulation loses R-value, increasing heating costs and creating cold spots that can further damage finishes; mold growth presents health concerns and often requires remediation that is more expensive than the initial stucco patch. Short-term homeowner actions include covering holes with breathable but water-shedding materials and scheduling an inspection, while long-term fixes focus on repairing the envelope and ensuring proper drainage and vapor management. Early response reduces remediation scope and cost while protecting indoor air quality.
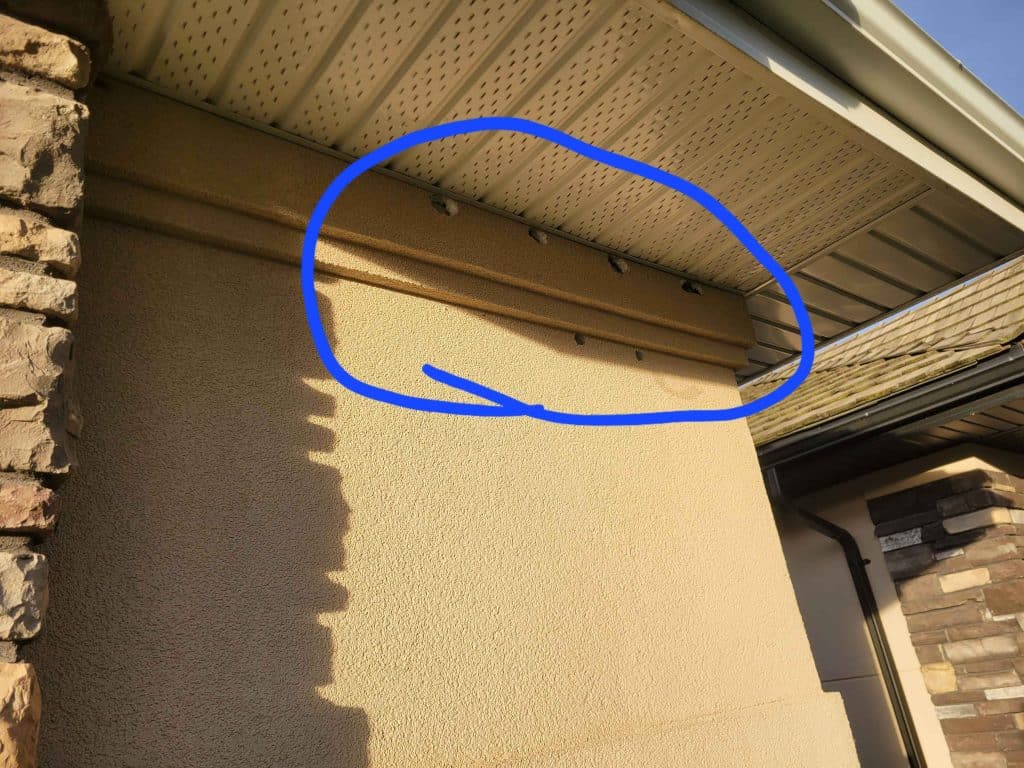

Beyond moisture, stucco penetrations can expose cavities to secondary pests such as carpenter ants, rodents, or wood-boring insects that exploit weakened sheathing and gaps in the drainage plane. Compromised sheathing and framing can lead to localized rot and deflection, especially where repeated pecking has removed reinforcement or attachment points; these structural concerns sometimes necessitate board replacement or framing repairs. Visual signs that indicate structural risk include sagging trim, persistent moisture stains, and accelerating hole growth despite deterrents. When those signs appear, a combined structural and pest inspection is advisable before cosmetic restoration to ensure that repairs address root causes rather than just surface damage.
Local stucco repair contractors in Edmonton provide a range of professional services that address inspection, pest assessment, material repair, and long-term prevention for woodpecker damage. Services typically begin with a detailed inspection to document hole patterns, test for moisture and insect activity, and determine whether repairs will be patch-only or require EIFS board replacement. Repairs proceed through removal of damaged material, reinforcement with mesh or new insulation board for EIFS, application of impact-resistant base coats where appropriate, and finish coat color matching; many providers offer limited warranties and post-repair monitoring options. Understanding the typical service sequence helps homeowners prepare for quotes and compare bids on equivalent scopes rather than price alone.
Introductory table: typical service steps, tools/purpose, and expected outcome/time.
Repair Step | Purpose / Tools | Outcome / Typical Time |
Inspection & Documentation | Moisture meter, probe, photo record | Scope defined; 1–2 hours |
Remove Damaged Material | Hand tools, cutting tools | Exposes sheathing/EIFS board; 1–4 hours |
Reinforcement & Base Coat | Mesh, adhesives, impact-resistant base | Structural support restored; 1–2 days |
Finish & Color Match | Acrylic/stucco finish, tinting | Aesthetic restoration; 1 day |
Warranty & Monitoring | Documentation, follow-up inspection | Peace of mind; varies |
This table summarizes the typical professional workflow and timing so homeowners can compare estimates with confidence and ensure each step is included in written scopes.
After the repair-step table, local service options and next actions are presented succinctly. If you prefer to engage professionals, local stucco repair contractors in Edmonton typically offer EIFS-specialist assessments, impact-resistant material upgrades, and written warranties; request a written scope and ask about monitored follow-up to confirm deterrent effectiveness. Many contractors will provide a free visual estimate and recommend immediate mitigation steps during the inspection to limit water entry. A short call-to-action: prepare clear photos of damage, note when pecking occurs, and request a documented quote and warranty terms during your initial contact.
Professional repair follows a clear sequence: inspect and document damage, remove compromised stucco or EIFS board, treat any insect or moisture issues, reinforce with mesh or new board, apply base coat and finish, then confirm color match and warranty. Each phase requires specific tools—moisture meters and probes for inspection, cutting tools for removal, fiberglass mesh and compatible base coats for reinforcement, and acrylic finishes for final appearance—selected to match either traditional cement stucco or synthetic EIFS systems. Time estimates vary by scope: small patch repairs can be completed in a day, while EIFS board replacement and curing may take several days. A crucial decision point is whether substrate replacement is required; when in doubt, prioritize diagnostic testing to avoid cosmetic fixes over structural problems.
EIFS repairs differ from traditional cement stucco because EIFS includes insulation boards and adhesive layers that may need replacement and reattachment rather than simple patching. Repairing EIFS often entails removing the damaged insulation board, treating any drainage or adhesive failures, installing new board with proper drainage plane details, and applying reinforced base coats with fiberglass mesh before finishing with a textured coat. EIFS demands careful moisture management and adhesion testing because failed drainage or bond issues can cause recurrent problems if only surface repairs are completed. Contractors experienced with synthetic stucco typically provide specialized diagnostics and may recommend impact-resistant base coat upgrades to reduce future pecking damage.
Preventing woodpecker damage blends physical modifications, visual and auditory deterrents, and material upgrades that reduce attractants and make surfaces less appealing for drumming or foraging. Effective prevention addresses root causes—removing insect prey, eliminating resonant cavities, and installing barriers where birds repeatedly target corners or trim. Regular inspection and prompt minor repairs reduce the likelihood of escalation, and material upgrades such as impact-resistant base coats or metal flashing at vulnerable edges protect finishes in high-risk locations. The following comparative table breaks down deterrent types with effectiveness, cost, and ease-of-installation to help homeowners choose the right combination for Edmonton conditions.
Introductory prevention table and guidance:
Deterrent Type | Effectiveness / Cost / Ease | Best-use-case Notes |
Physical Barrier (metal flashing, corner guards) | High / Moderate cost / Professional installation | Best for persistent impact areas and high-visibility edges |
Hardware Mesh (stainless/hardware cloth) | High / Low-moderate cost / Moderate DIY or pro install | Effective under eaves and behind decorative trim |
Visual Deterrents (reflective tape, decoys) | Moderate / Low cost / Easy install | Short-term or supplemental use; rotate frequently |
Auditory Devices (recorded distress calls) | Variable / Low-moderate cost / Moderate maintenance | Use intermittently; limited seasonality in Edmonton |
This table clarifies trade-offs so homeowners can combine barriers and deterrents cost-effectively to match specific damage patterns and aesthetic preferences.
Physical installations and deterrents work best when combined; for example, metal corner guards paired with periodic visual deterrents reduce both impact and investigatory pecking. Seasonal maintenance—inspecting for insect activity, repainting exposed finishes, and replacing worn deterrents—keeps defenses effective in Edmonton’s variable climate. The next subsection details specific barrier types and how to choose the right approach for your home.
Physical barriers such as metal flashing, stainless steel hardware cloth, and decorative corner guards protect vulnerable edges and trim where woodpeckers concentrate their pecking. Metal flashing installed at seams and transitions prevents access to soft substrates and provides a durable surface that resists chipping; hardware cloth mounted behind trim prevents birds from reaching substrate while remaining discreet. Aesthetic trade-offs exist: visible metal may change curb appeal, so selective placement at high-impact areas is often the best compromise. For permanent protection in Edmonton, combine flashing with routine inspections to detect adjacent delamination and address insect attractants that originally drew the birds.
Visual deterrents (reflective tape, moving pinwheels, predator decoys) and auditory devices (recorded distress or predator calls) can reduce woodpecker visits when used correctly and rotated periodically to prevent habituation. Reflective items that move with wind create unpredictable visual cues that discourage pecking in the short term, while auditory deterrents require intermittent use to remain effective and may be less practical in dense residential areas. Combine deterrents with physical barriers and insect control for best results; deterrents alone rarely eliminate the problem if underlying substrate or pests persist. Always account for protected-species regulations by using deterrents that avoid injury and by prioritizing non-lethal methods.
Costs for woodpecker stucco repair in Edmonton vary widely depending on damage extent, whether repairs are patch-only or require EIFS board replacement, access conditions, and finish complexity including color matching. Typical market ranges for simple patch repairs start at modest figures for isolated holes, while EIFS board replacement, drainage-plane repairs, and impact-resistant material upgrades increase costs substantially. Other drivers include scaffolding or lift requirements for height work, the need for moisture remediation or insect treatment, and warranty-backed materials that carry higher upfront prices but can reduce long-term risk. The following EAV table compares common repair elements, complexity, and sample market ranges to help homeowners set realistic expectations and prepare for contractor quotes.
Repair Element | Typical Size / Complexity | Cost Driver Description / Sample Market Range |
Hole Patching (traditional stucco) | Small localized holes; low complexity | Material + labor; common-market range: modest per hole depending on finish matching |
EIFS Board Replacement | Board-sized sections; moderate-high complexity | Removal, new board, adhesive, reinforcement, finish; sample range: higher due to materials and curing |
Color Match & Finish | Texture and tinting required | Skilled labor and time; adds to total cost when blends are needed |
Access & Scaffolding | Height or awkward access | Rental and safety costs; significant for second-story work |
This EAV comparison helps homeowners understand which repair elements most affect price and which questions to ask when comparing estimates.
Primary cost factors include the number and size of holes, whether underlying sheathing or EIFS board is damaged, access and scaffolding needs, and finish complexity for color and texture matching. Moisture remediation and pest treatment add to costs when inspection reveals wet insulation or active insect populations; similarly, structural repairs to framing require specialist trades and increase project scope. Upgrading to impact-resistant base coats or metal flashings will raise initial costs but can reduce recurrence and long-term maintenance. To control costs, homeowners should consolidate repairs where possible, address insect issues before cosmetic work, and request detailed line-item estimates showing material and labor breakdowns.
To obtain a reliable free estimate, take clear photos of all affected areas from multiple angles, note dates and times of observed pecking, and provide a brief history of prior repairs or pest issues when contacting local contractors. Expect a visual remote estimate initially, but understand that accurate quotes often require an onsite inspection with moisture testing and an assessment of attachment/EIFS board condition. Ask contractors to include scope-of-work details, timeline estimates, warranty terms, and whether impact-resistant materials are proposed as an option. Preparing this information speeds up accurate quoting and helps compare proposals on equivalent scopes rather than price alone.