OUR SUPPLIERS
Every project is unique and requires a different approach. Working with variety of suppliers and manufacturers ensure that we deliver the best results.








Solida Coatings has been helping homeowners, builders, contractors, developers and property managers in Calgary for many years with stucco eating birds and woodpecker holes repairs. It is our mission to provide best results for your building’s exterior cladding system. We offer our services for various stucco repair projects.
Woodpecker damage to stucco is more than an aesthetic problem; even small peck marks can expose substrate and allow water to penetrate, leading to rot, mold, and costly structural repairs if left unchecked. Solida Coatings is a stucco contractor offering woodpecker damage repairs for both residential and commercial properties. Solida Coatings takes on any size and kind of repair project with ease, using only top quality materials from reputable suppliers which helps provide better results for your project. Solida Coatings offers free estimates for stucco repair projects.

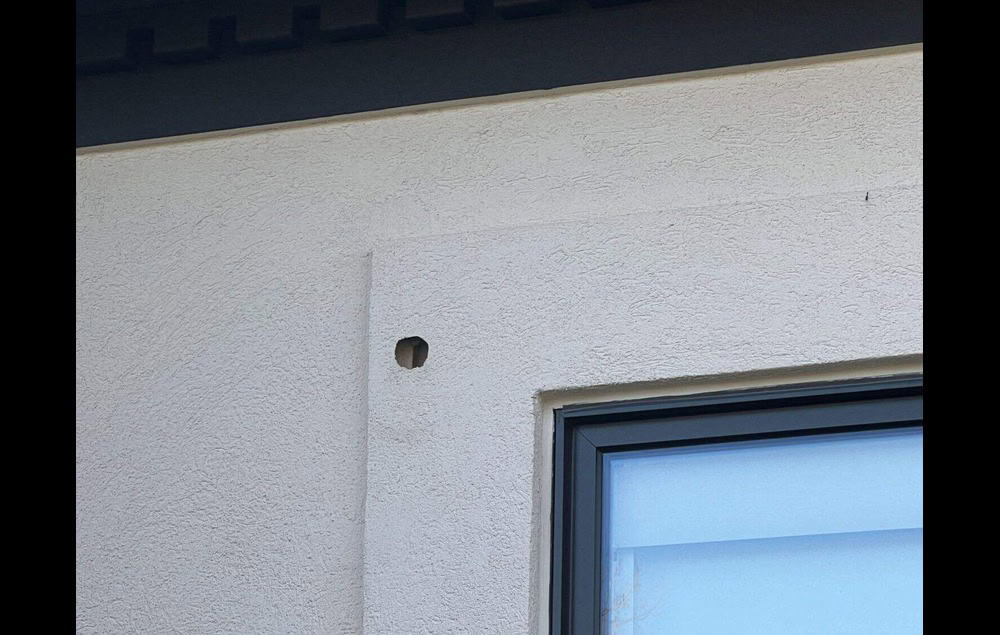
Woodpeckers tend to peck holes into EIFS (Exterior Insulation and Finish Systems) to get worms and bugs to eat and when they realize there aren’t any, they leave. They also peck holes into the stucco to build nests. Woodpeckers and other birds that do this are unusually known as stucco eating birds.
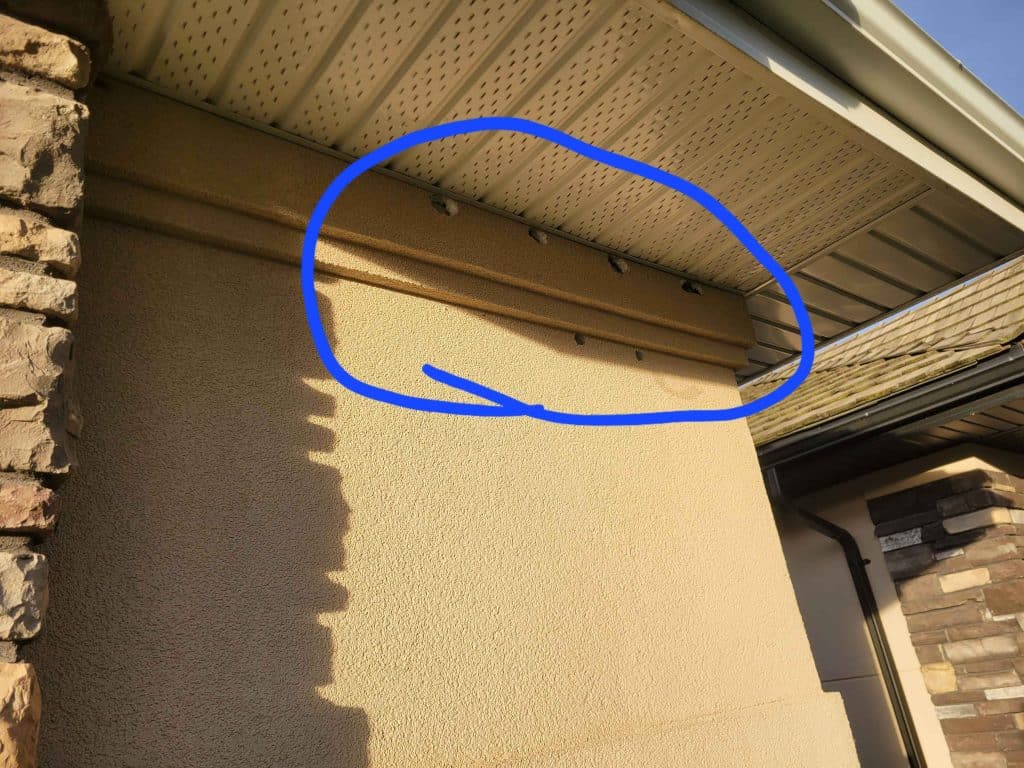
There might be multiple holes and if these damaged areas are left alone, it might even cause water damage, rotting the substrate such as plywood behind the stucco. These holes tend to be relatively easy to fix, which depend on where they are located since these birds are prone to peck holes under the soffit, meaning that the damaged areas are usually are in high places.
If there are multiple holes that are next to each other, we do recommend to apply the finishing to the entire section to revert back it’s aesthetics since the multiple patches next to each other would be unappealing. A couple patches here and there would conceal the damaged areas almost perfectly, however multiple holes would require a complete application of the acrylic finish coating after fixing the holes.
We can help with most types of stucco repair services. Contact us today if you have any questions and would like to get a quote.
Woodpecker damage to stucco in Calgary arises from a combination of bird behaviour, material cues, and local environmental factors. Birds like the Northern Flicker drum and peck to communicate territory, excavate nesting cavities, or probe for insects—behaviour that finds stucco and EIFS attractive when surfaces sound hollow or conceal insect activity. Material vulnerability is key: EIFS systems with foam insulation and gaps behind finishes can mimic natural cavities and amplify sound, while older traditional stucco over voids can produce resonant echoes. These drivers interact with nearby trees, insect infestations behind cladding, and seasonal breeding or migration patterns to increase risk during specific months.
Bird behaviour, surface properties, and site context together determine where pecking occurs and how severe it becomes. Understanding these causes leads directly into practical detection: the next section explains how to identify woodpecker holes and assess their severity for timely repair.
The Northern Flicker targets stucco and EIFS primarily because of acoustic and foraging cues: hollow or insulated wall assemblies echo drumming that propagates territory signals, while insulation gaps and insect activity behind finishes present foraging opportunities. These birds use drumming to communicate, and any planar surface that amplifies sound becomes a chosen drum. EIFS systems that include foam insulation boards produce a different acoustic signature and may feel softer under pecking, which attracts repeat attention. In Calgary, homes close to green spaces or older buildings with insect problems are statistically more likely to see flickers investigate exterior walls.
Recognizing the bird’s motivation—communication versus feeding—helps homeowners choose deterrents that target the correct behaviour. This behavioural context clarifies which repairs and prevention strategies will be effective long-term.
Identifying woodpecker damage starts with visual and tactile inspection: holes are typically round to slightly elongated, with surrounding chipped finish, feathered edges, or clustered patterns where birds tested multiple spots. Look near eaves, corners, soffits, and areas facing trees or insect-infested zones; small surface chips may indicate early pecking, while penetrations revealing insulation or substrate show higher severity. Use a flashlight and feel for soft spots or flaking to detect hidden breaches and check for frass or insect signs that might have attracted the bird. Categorize severity into surface chips (cosmetic), partial penetrations (finish and basecoat compromise), and full penetrations (insulation/substrate exposure) to inform repair urgency.
A clear severity category directs whether a homeowner can attempt a DIY patch or should call a professional to preserve system integrity and warranties.
Repairing woodpecker holes in Calgary depends on whether the house uses traditional cement stucco or an EIFS system; each requires different materials and sequencing to restore weather resistance and appearance. The repair workflow emphasizes cleaning and substrate assessment, controlled removal of damaged material, layered rebuilding (scratch/brown/finish for traditional stucco or insulation/mesh/finish for EIFS), and careful color and texture matching to blend repairs. Proper curing, moisture checks, and use of compatible materials preserve durability and reduce the risk of future failures. For complex or system-critical EIFS repairs, professional installers with system knowledge are recommended to maintain manufacturer warranty conditions.
Different repair techniques deliver distinct outcomes depending on the stucco system and damage severity.
Repair Technique | Best for (System Type) | Pros / Cons and Typical Cost Range |
Layered patching (scratch/brown/finish) | Traditional stucco | Pros: restores structural layering and texture; Cons: requires curing time and skilled finish; Typical Cost: low-to-moderate per small hole |
Insulation board replacement + mesh embedment | EIFS | Pros: restores insulation and system continuity; Cons: requires system-specific materials and fastener techniques; Typical Cost: moderate-to-high for full board replacement |
Surface skim coat + color feathering | Both (cosmetic) | Pros: quick aesthetic fix for small chips; Cons: doesn’t address substrate damage; Typical Cost: low for cosmetic patches |
Replace/repair substrate and reflash as needed | Severe penetrations | Pros: addresses water intrusion risk; Cons: more invasive and costly; Typical Cost: high, depending on access and extent |
This table helps homeowners match repair method to system and budget; the next paragraphs describe step-by-step approaches for each system and why color matching matters.
Patching traditional stucco holes follows a layered approach: remove loose material and clean the cavity, verify substrate soundness, and apply a bonding agent before rebuilding the scratch coat, brown coat, and finish coat in successive layers. Each coat must be properly keyed and cured—scratch for adhesion, brown for leveling, and finish for texture replication—to avoid delamination and visible seams. Professionals use trowel and float techniques to replicate the original finish and often feather edges to reduce contrast. For small cosmetic chips, a skilled color feather and finish skim can restore appearance without full-layer reconstruction, but any sign of moisture or compromised substrate should trigger a deeper repair.
Correct sequencing and curing protect against future cracking and water intrusion, and this leads to a more complex EIFS-specific workflow described next.
EIFS repairs start by removing damaged foam insulation and assessing the adhesive bond and substrate integrity, then replacing insulation board segments and embedding reinforcing mesh into basecoat before applying a compatible finish coat. The critical distinctions are system continuity and moisture management: EIFS requires manufacturer-approved materials and fastening strategies to preserve thermal performance and drainage or barrier functionality. Professionals often follow system-specific protocols—such as matching mesh type and basecoat thickness—to ensure adhesion and warranty compliance. Because EIFS components are engineered as a layered system, piecemeal fixes that ignore mesh or insulation replacement can lead to recurrent failures and voided warranties.
Accurate execution of EIFS repairs preserves insulation performance and prevents hidden water pathways that could emerge from incomplete patches.

Color matching matters because even a structurally perfect patch will stand out if the pigment, finish texture, or cumulative weathering differs from the surrounding wall, reducing curb appeal and resale value. Professionals take photos, mix samples, and apply feathering techniques to blend new material into aged finishes; they account for UV fading and surface dirt when matching pigment and may suggest sealing strategies to slow future mismatch. Batch-to-batch variability in finish products makes on-site sampling essential, and some contractors offer small-area test patches to confirm match before full repair. Investing in accurate color and texture replication ensures repairs are visually seamless and the exterior maintains consistent performance.
A well-matched repair also reduces the likelihood of repeat patching for cosmetic reasons, shifting focus to long-term surface protection discussed next.
Preventing woodpecker damage combines physical exclusion, behavioural deterrents, surface modification, and routine maintenance to reduce attractants. Effective strategies include installing discreet netting or stainless fasteners at vulnerable eaves, applying specialized protective coatings such as ShieldIt or Adex Graphex AMB to improve impact resistance, and using visual or auditory deterrents targeted at drumming behaviour. Maintenance tasks—addressing insect infestations behind cladding, trimming vegetation near walls, and promptly repairing small chips—cut off the triggers that draw birds. A layered prevention plan that pairs physical barriers with surface reinforcement and habitat management yields the best long-term results for Calgary homes.
The table below compares deterrents and coating choices by effectiveness, cost, and lifespan to help homeowners weigh options for both traditional stucco and EIFS systems.
Method / Product | Effectiveness / Cost / Lifespan | Notes on Suitability for Stucco / EIFS |
Netting (discreet mesh) | High effectiveness, moderate cost, 3–10 year lifespan | Best for focused eaves and soffits; needs professional tensioning to avoid contact with finishes |
Reflective tape / visual deterrents | Moderate, low cost, short-term lifespan | Good for initial discouragement; visible and may require frequent repositioning |
Auditory devices (sound deterrents) | Variable effectiveness, moderate cost, variable lifespan | Targets territorial drumming but may affect neighbours and is less durable as birds habituate |
ShieldIt coating | High impact resistance, moderate-to-high cost, long lifespan | Designed for system coatings; compatible with some EIFS/traditional finishes when applied per spec |
Adex Graphex AMB | High abrasion/impact resistance, moderate cost, long lifespan | Manufacturer-specific application; follow system guidelines to maintain warranty compatibility |
This EAV-style comparison clarifies trade-offs between visibility, longevity, and system compatibility; the following sections describe deterrent selection and maintenance best practices.
Choosing deterrents depends on severity, location, and legal/ethical considerations; for localized pecking, discreet netting or stainless-steel mesh installed under eaves is often the most effective long-term option. Reflective tape and decoy predators can deter curious birds temporarily but may lose effectiveness as birds habituate, while ultrasonic or auditory devices can be useful short-term but may disturb neighbours or be limited by municipal rules. Installation considerations matter: avoid adhesives directly on finishes, use non-penetrating mounts where possible, and consult a contractor for netting to prevent finish damage. Ethical deterrence—avoiding harm and complying with wildlife protections—should guide choice and timing.
Selecting the right deterrent leads naturally to surface reinforcement options like specialty coatings.
Specialized coatings such as ShieldIt and Adex Graphex AMB increase surface toughness and impact resistance while also sealing microscopic finish pores to slow water ingress and reduce the likelihood that birds will find soft targets. These coatings operate by adding a harder, more resilient outer layer that resists chipping from pecking and moderates acoustic feedback that attracts drumming birds. For EIFS, coatings must be system-approved to avoid disrupting breathability or adhesion; manufacturers often specify compatible topcoats and application thickness. While coatings reduce cosmetic and small-impact damage, they are not a guaranteed solution for active nesting behaviour and are best combined with exclusion measures.
Understanding coating function clarifies that coatings are part of an integrated plan, not a standalone cure, and that maintenance practices are a necessary complement.
Long-term maintenance centers on routine inspections, insect management, and habitat modification to remove attractants that prompt pecking. Inspect vulnerable elevations twice yearly—after migration and before winter—for small chips, soft spots, or insect signs and address them with immediate temporary sealing to prevent escalation. Coordinate with pest control professionals if evidence of wood-boring insects or other pests exists behind cladding, since foraging drives can be a primary attractor. Finally, trim trees and shrubs away from walls to reduce perching sites, and document repairs and coatings to support future warranty or contractor claims.
Routine maintenance reduces both the chance of initial pecking and the escalation from cosmetic chips to structural compromise.
Cost for woodpecker stucco repair in Calgary varies significantly by damage severity, system type (traditional vs EIFS), access and height, and color matching requirements. Small cosmetic patches that only address the finish will be the least expensive, while EIFS board replacements, mesh embedding, and substrate remediation are the costliest due to material specificity and labour intensity. Extra cost drivers include scaffolding or lift rental for high facades, extensive color matching work, and any insulation or moisture mitigation required underneath the finish. Because variability is high, homeowners should obtain multiple written quotes that itemize materials, labour, and warranty terms to compare value rather than price alone.
The table below gives typical cost scenarios and the key factors that influence price to help homeowners estimate expected ranges and plan budgets.
Damage Scenario | Typical Cost Range (CAD) | Key Factors Affecting Price |
Single small cosmetic hole | $150–$450 | Access, finish touch-up, color matching complexity |
Multiple clustered holes (small) | $400–$1,200 | Area extent, texture replication, minor substrate work |
EIFS insulation board replacement (single board) | $800–$2,500 | Board size, mesh/basecoat replacement, system compliance |
Extensive EIFS repair or water-damage remediation | $2,500+ | Moisture mitigation, insulation replacement, scaffolding |
Primary cost drivers include damage size and depth, system type (traditional stucco vs EIFS), the need to replace insulation or mesh, and the complexity of matching texture and color. Access issues—such as multi-storey walls requiring lifts or scaffolding—increase labour and equipment costs quickly, while hidden moisture or rot found during repair can add remediation steps. Material selection and whether the repair uses system-approved products (important for EIFS) also affect prices, as does contractor experience and warranty inclusion. Understanding these drivers helps homeowners decide between targeted cosmetic fixes and full-system repairs that reduce long-term risk.
A clear itemized quote that separates these elements prevents surprises and supports informed decision-making about scope.
Typical professional pricing aligns with the scenarios in the cost table: small single-hole cosmetic repairs are generally under $500, multiple-hole clusters run into the low four figures, and EIFS board replacements or water-damage remediation can exceed $2,500 depending on extent and remediation needs. Exact prices vary with site access, required scaffolding, and finish matching effort; specialist EIFS work commands higher rates due to material specificity and warranty implications. Homeowners should interpret quotes with attention to included steps—substrate checks, mesh replacement, finish matching, and any warranties—rather than comparing bottom-line numbers alone.
Professional stucco repair services offer technical knowledge, system-specific materials, and finish replication skills that protect both function and curb appeal. Professionals understand layered repair sequencing, moisture mitigation, and EIFS system continuity, which reduces the risk of recurrent damage or voided warranties. They also provide access to color-matching tools, controlled curing environments, and scaffold or lift equipment for safe, high-quality work. While DIY may suffice for tiny surface chips, complex penetrations, EIFS board replacement, and any repair requiring warranty preservation are best handled by trained stucco contractors.
Professional repair improves durability through correct substrate remediation, proper adhesion techniques, and use of system-approved materials that restore barrier integrity and prevent moisture pathways. Professionals replicate texture and color using controlled mixing, feathering, and test patches to minimize visible seams and maintain curb appeal. Their work also tends to include moisture checks and flashings that DIY patches frequently omit, reducing risks of hidden damage and future water intrusion. The combined technical and aesthetic benefits translate into longer-lasting repairs and a better return on investment over the life of the home.
Proper professional work therefore preserves both the building envelope and the visual continuity of the exterior wall.
Early detection of woodpecker activity allows inexpensive interventions before damage escalates to costly substrate or insulation repairs. Early signs include small chips, localized soft spots, audible drumming at specific wall locations, and fresh flaking or frass; these symptoms often precede larger penetrations. Secondary effects of unrepaired holes include water intrusion that leads to insulation degradation, mold growth, and pest access through created entry points, which compound repair costs and health risks. Timely temporary sealing and expedited assessment limit these cascading impacts and are recommended when early signs appear.
Woodpecker holes create direct pathways for rain and meltwater to contact insulation and substrate, undermining thermal performance and promoting rot or mold in concealed layers. Once water bypasses the finish and basecoat, drying becomes slow, and pests such as wasps, rodents, or wood-boring insects can exploit the openings to nest or feed, escalating damage. Early containment—like temporary sealing with compatible tapes or elastomeric patches—reduces short-term risk, but professional assessment is necessary to verify substrate integrity and prevent long-term moisture entrapment. Addressing the root cause and properly remediating substrate prevents progressive deterioration.
Prompt action on early holes protects insulation value and structural components, so timing of repairs is critical.
The best time to repair woodpecker damage balances bird protection and practical weather windows: avoid interfering during active nesting seasons and prioritize repairs in fall or summer when nests are less likely and surfaces are drier or easier to prep. Urgent repairs for water-exposed penetrations should not be delayed—temporary weatherproofing can be applied immediately while full repairs await ideal conditions. Be mindful of local wildlife regulations protecting species such as the Northern Flicker and choose deterrents and timing that comply with ethical guidelines. Scheduling professional repairs outside peak nesting periods reduces legal and conservation concerns while enabling technicians to work safely.
Timing repairs thoughtfully ensures legal compliance, effective deterrence, and optimal repair conditions for long-term success.