OUR SUPPLIERS
Every project is unique and requires a different approach. Working with variety of suppliers and manufacturers ensure that we deliver the best results.






Solida Coatings has been helping homeowners, builders, contractors, developers and property managers in St. Albert for many years with stucco eating birds and woodpecker holes repairs. It is our mission to provide best results for your building’s exterior cladding system. We offer our services for various stucco repair projects.
Woodpecker damage to stucco is more than an aesthetic problem; even small peck marks can expose substrate and allow water to penetrate, leading to rot, mold, and costly structural repairs if left unchecked. Solida Coatings is a stucco contractor offering woodpecker damage repairs for both residential and commercial properties. Solida Coatings takes on any size and kind of repair project with ease, using only top quality materials from reputable suppliers which helps provide better results for your project. Solida Coatings offers free estimates for stucco repair projects.

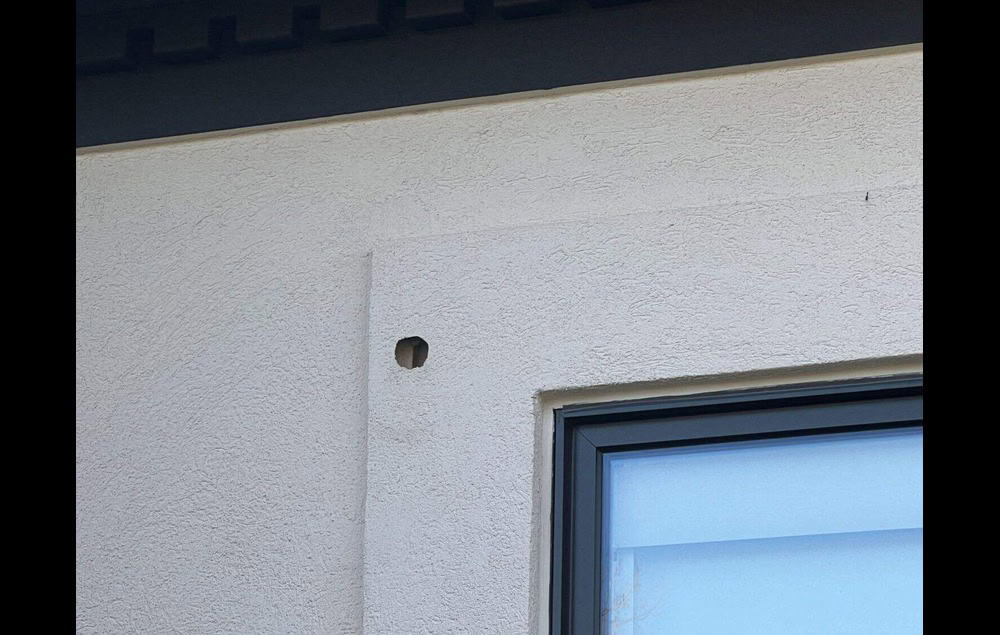
Woodpeckers tend to peck holes into EIFS (Exterior Insulation and Finish Systems) to get worms and bugs to eat and when they realize there aren’t any, they leave. They also peck holes into the stucco to build nests. Woodpeckers and other birds that do this are unusually known as stucco eating birds.
There might be multiple holes and if these damaged areas are left alone, it might even cause water damage, rotting the substrate such as plywood behind the stucco. These holes tend to be relatively easy to fix, which depend on where they are located since these birds are prone to peck holes under the soffit, meaning that the damaged areas are usually are in high places.
If there are multiple holes that are next to each other, we do recommend to apply the finishing to the entire section to revert back it’s aesthetics since the multiple patches next to each other would be unappealing. A couple patches here and there would conceal the damaged areas almost perfectly, however multiple holes would require a complete application of the acrylic finish coating after fixing the holes.
We can help with most types of stucco repair services. Contact us today if you have any questions and would like to get a quote.
Woodpecker damage to stucco occurs when birds respond to acoustic cues, foraging opportunities, or nesting prospects and encounter exterior cladding that is acoustically attractive or easy to penetrate. In St. Albert, seasonal behavior — especially spring territorial drumming and late-winter foraging — increases pecking incidents, and the composition of EIFS (foam-backed panels) often amplifies sound and feels softer under pecks. The result is repeated small holes or larger excavations that expose insulation or the water-resistive barrier, creating pathways for moisture and heat loss. Understanding these drivers helps homeowners prioritize inspection and prevention strategies before moisture problems begin.
Woodpecker activity is often concentrated near eaves, corners, and areas that create resonant cavities; these locations are also common weak points in weather-proofing. Recognizing patterning — repeated holes in a band, or one focal site of drumming — helps differentiate territorial behavior from feeding or nest excavation. The next subsection identifies the species most commonly responsible in St. Albert and how their behavior influences damage patterns.
The Northern Flicker is the primary woodpecker species most frequently implicated in stucco pecking in Alberta, and its behavior explains many common damage patterns observed on local homes. Northern Flickers typically engage in both foraging and drumming, and their preference for vertical surfaces and resonant cavities makes foam-backed cladding and hollow-sounding EIFS attractive targets. These birds are protected by wildlife laws that limit lethal control, so homeowners should focus on deterrence and repair rather than removal. Seasonal timing matters: territorial drumming spikes in spring while foraging pecking can occur year-round, which informs when preventive measures are most effective.
Understanding species-specific habits points homeowners toward humane, legal deterrent choices and timing for installation of barriers, which is critical before undertaking cosmetic repairs. This leads into why certain cladding types, notably EIFS, are especially vulnerable.
EIFS (Exterior Insulation and Finish Systems) is composed of insulation board over substrate, a reinforcing mesh embedded in base coat, and a textured finish coat — a layered assembly that often produces hollow-sounding resonance and a softer bite than cement-based stucco. This acoustic quality mimics natural cavities and amplifies drumming signals, which attracts species that use sound to communicate or locate foraging sites. EIFS panels also have a foam core or insulation board (a meronym of the system) that is easier for a woodpecker’s bill to penetrate than hard cementitious render, increasing the rate of substrate exposure and moisture risk. Consequently, repairs on EIFS often require substrate or insulation board replacement in addition to surface patching, which affects cost and long-term durability.
Because EIFS repairs must address both the insulating panel and the finish, homeowners need to confirm whether damage is limited to the finish coat or has compromised the insulation or WRB before choosing a DIY patch. The next major section explains inspection and repair workflows tuned to these material differences.
Repairing woodpecker holes in stucco begins with a structured assessment that confirms hole size, depth, substrate type (EIFS vs cement stucco), and any moisture infiltration, and then follows a rebuild and finish process that restores weather protection and appearance. Professional repairs prioritize substrate reinforcement, mesh embedment, and layered curing to match texture and color, while small, superficial holes on cement stucco may be suitable for carefully executed DIY patches. Proper inspection reduces the risk of hidden moisture or insulation damage that can lead to mold; homeowners should probe for softness, visible insulation, or dampness around the hole before deciding on a repair path. The following numbered steps summarize the typical repair workflow and highlight when to call a professional to ensure warranty-ready results.
Step-by-step professional and DIY guidance below clarifies actions, timing, and materials so homeowners can make informed decisions.
These steps outline the core workflow and indicate where material differences (EIFS vs cement) change the scope of work and timeline. The next subsection details the professional repair process, materials, and quality markers.
Professional stucco repair begins with a thorough diagnosis that defines whether only the finish coat is affected or the insulation board and WRB are compromised, and this informs method selection and warranty prospects. A contractor will typically remove loose finish, cut back to solid substrate, replace or repair insulation board on EIFS if needed, embed a corrosion-resistant reinforcing mesh, apply a compatible base coat, then texture and color-match the finish to surrounding areas. Quality markers include full embedment of mesh into the base coat, proper curing times between layers, compatible material systems (cement-based over cement cladding; EIFS products for foam systems), and documented color-matching trials.
Time to complete varies: a single small repair may be finished in a day or two, while EIFS panel replacement with finish-matching and curing can take several days to a week including curing and painting.
Contractors should provide itemized scopes that specify materials and anticipated timelines, which helps homeowners compare quotes and evaluate warranty coverage. The next subsection explains DIY limits and a safe method for minor repairs.
DIY repair is appropriate only for small, shallow holes (typically under roughly 25–30 mm) where the substrate and WRB remain intact and there is no evidence of moisture or insulation damage; attempting DIY on EIFS or deep holes risks trapping moisture and voiding later contractor warranty work. For eligible small holes, homeowners should clean debris, use a compatible patch compound or exterior-grade patching mortar for cement stucco, press in a small foam backing if necessary for deep voids, apply a bonding agent, then build base and finish coats before texture and paint matching. Safety and finish quality depend on proper surface preparation, consistent layer thickness, and realistic expectations about color and texture matching; test patches and gradual feathering often produce the best visual result. Red flags requiring professional evaluation include soft substrate, visible insulation, multiple clustered holes, or any signs of damp staining.
If the DIY attempt reveals deeper damage or poor substrate integrity, homeowners should pause and get a professional assessment to avoid escalating moisture issues. Below is a comparative EAV table to help weigh repair method choices.
Repair Method | Key Attribute | Typical Outcome |
Small patch (cement stucco) | Materials: patch mortar, bonding agent | Quick cosmetic fix for shallow holes; low cost, moderate durability |
EIFS panel repair | Materials: insulation board, mesh, EIFS base/finish | Restores thermal and weather barrier; moderate-to-high cost, high durability when done correctly |
Full panel replacement | Materials: new substrate, WRB, lath/EIFS panel, finish coat | Best longevity for severe substrate damage; higher cost, strong warranty potential |
This comparison shows that method selection depends on substrate type and damage severity; homeowners should prefer substrate-level repair for EIFS integrity. The next major section evaluates prevention options and their trade-offs.
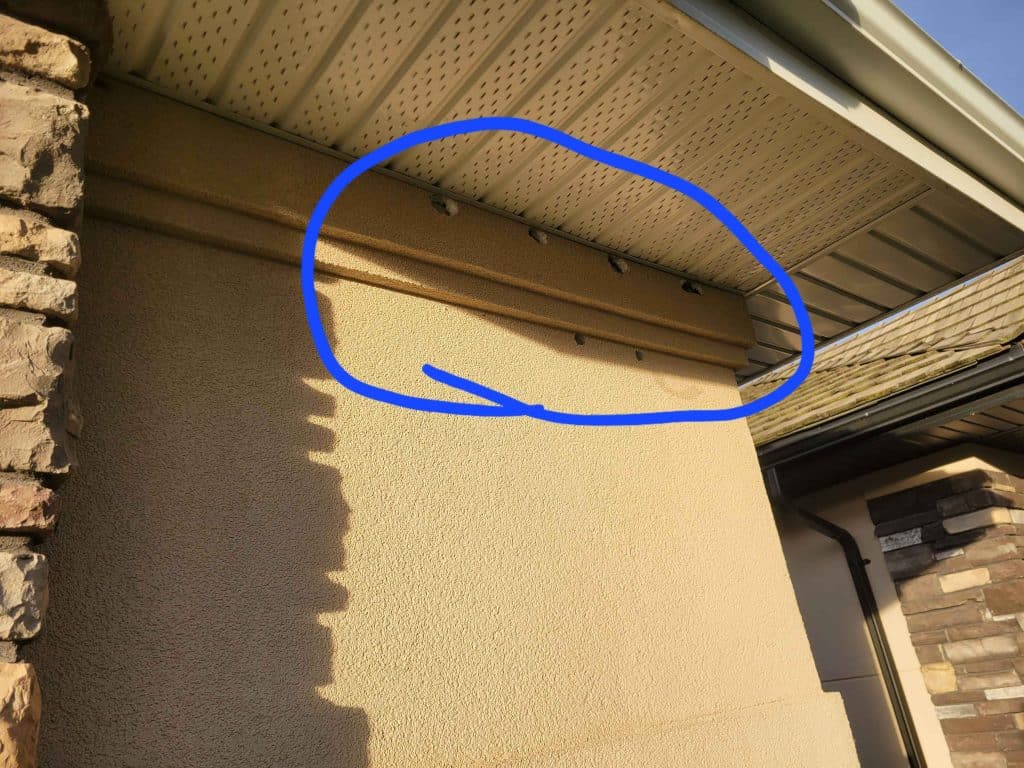

Prevention centers on denying access, disrupting acoustic cues, and making cladding less attractive while complying with humane and legal guidelines; effective strategies vary by cladding type and location on the house. Physical barriers such as bird netting or locally attached screens prevent direct pecking when installed with proper tension and clearance, while protective overlays and impact-resistant coatings for EIFS can reduce penetration and acoustic resonance. Visual and auditory deterrents have mixed success: reflective tape and decoys may deter some birds temporarily, and sound devices can work short-term but often lose efficacy with habituation. Homeowners should combine physical exclusion near hotspots with proofing and humane deterrents timed for pre-breeding seasons to reduce repeat incidents.
Understanding maintenance needs and expected lifespan of each option helps set realistic expectations and cost-benefit trade-offs for long-term protection.
Netting and screening act by creating a physical gap between the bird and the cladding, removing the bird’s ability to strike the surface directly and thereby preventing new holes; proper installation requires secure anchoring and sufficient clearance so birds cannot reach through or get entangled. EIFS proofing systems work differently: they improve impact resistance by adding a tougher outer layer or retrofit overlays that increase surface hardness and reduce resonance, often combined with reinforcement at vulnerable edges and joints. Netting typically lasts multiple seasons but requires periodic inspection for UV degradation; proofing overlays are longer-term but may change appearance or require professional installation for warranty retention. A combined approach — netting at eaves and proofing on exposed panels — often provides the best balance of immediate protection and long-term resilience.
Choosing between netting and proofing depends on aesthetic tolerance, maintenance willingness, and whether the target area is small and localized or widespread across elevations. Below is a comparative EAV table summarizing prevention options.
Prevention Option | Characteristic | Typical Value / Use-case |
Bird netting | Effectiveness: High (localized); Maintenance: Moderate | Best for eaves and single-story overhangs; humane and reversible |
EIFS proofing overlay | Characteristic: Durable surface; Maintenance: Low | Retrofit for vulnerable panels; higher upfront cost, long-term protection |
Reflective/visual deterrents | Effectiveness: Low–Moderate; Maintenance: Low | Short-term behavioral deterrent; combine with barriers |
Sound deterrents | Effectiveness: Variable; Maintenance: Moderate | Temporary reduction in pecking; habituation common |
This comparison clarifies that netting and EIFS-specific strengthening are the most reliable long-term choices for preventing stucco pecking. The next subsection ranks deterrents and explains humane considerations.
Recommended deterrents prioritize humane exclusion and long-term effectiveness while acknowledging legal protections for native birds; top choices combine physical exclusion with targeted visual cues rather than lethal control. Reflective streamers and rotational visual devices can reduce initial curiosity-driven pecking, while professionally installed netting or mechanical screens provide consistent exclusion. Sound deterrents may assist briefly but should not be relied on alone due to habituation; any auditory system should be adjusted periodically and used in conjunction with exclusion techniques. Because Northern Flickers and other protected species have legal status, homeowners should avoid harmful or lethal measures and prefer reversible solutions that do not entangle birds.
Implementing a layered strategy — netting on hotspots, proofing vulnerable EIFS panels, and adding visual deterrents during high-activity seasons — yields the strongest preventive outcome. Below is a list ranking deterrents from most to least effective with rationale.
This ranking helps prioritize interventions for homeowners planning phased prevention work. The next major section turns to cost, a top concern for many St. Albert residents.
Repair cost depends on substrate type (EIFS repairs typically cost more than cement stucco patches), hole size and count, access complexity, and whether moisture or insulation remediation is required. Small cosmetic patches on cement stucco might be relatively inexpensive per hole, while EIFS panel repairs or replacements that restore insulation and WRB frequently carry higher material and labor costs plus texture/color matching work. Access costs (scaffolding or lift rental), the need for additional trades (insulation or carpentry for structural wood repair), and warranty expectations all influence final quotes; homeowners should ask contractors for itemized, written estimates and clarifications on warranty coverage for recurrence due to birds. The next subsections break down common cost drivers and explain how to obtain reliable estimates.
Before getting quotes, gather clear photos, measure hole sizes, and note top-of-wall elevations; this improves estimate accuracy and reduces variation between bids.
Key cost drivers include substrate (EIFS versus cementitious stucco), hole perimeter and depth, presence of moisture or rot, and access difficulty such as height or confined work areas requiring scaffolding. EIFS repairs often require panel replacement or insulation board repair plus mesh and finish application, increasing both material and labor hours, while small surface-only holes in cement stucco need only patch mortar, texture blending, and paint. Color and texture matching adds cost when the finish is aged or custom, and moisture remediation (drying, insulation replacement, mold treatment) further increases scope and price. Sample scenarios: a single small cement stucco patch on a single-story wall is low-cost, while multiple EIFS panel repairs with substrate replacement and scaffolding can be several times higher.
Understanding these factors helps homeowners interpret quotes and plan budgets before committing to repairs. The following table maps common cost drivers to sample price ranges to help set expectations.
This table shows typical cost drivers and sample impact ranges to clarify estimates for homeowners seeking quotes.
Cost Driver | Attribute | Sample Price Range Impact |
Substrate type | EIFS vs cement | EIFS repairs: higher (+30–100% vs patching) |
Hole size/count | Single small vs multiple | Multiple holes increase labor and texture matching costs |
Access difficulty | Scaffolding/lift required | Adds labor and rental fees; can double labor line |
Moisture/insulation | Remediation required | Significant increase due to drying, insulation, and trades |
Interpreting estimates with these drivers in mind helps homeowners assess whether a low bid omits critical remediation or a high bid properly accounts for substrate and warranty concerns. The next subsection explains how to get accurate quotes and warranty details
To obtain accurate estimates, homeowners should prepare a packet of documentation—clear photos from multiple angles, measurements of hole sizes, indication of substrate type, and notes about any staining or softness—then request itemized written quotes that separate materials, labor, access, and remediation costs. Ask contractors for references and before/after photos of similar EIFS or woodpecker repairs, and request written warranty terms that specify coverage for workmanship, material defects, and whether repeat bird damage is covered or excluded. Verify that the contractor carries appropriate insurance and clarifies whether their warranty remains valid if additional prevention measures (netting or overlays) are not implemented. Comparing at least two to three itemized quotes and asking targeted questions about substrate repair, mesh embedment, and color-matching procedures reduces the chance of surprises.
A focused contractor-question checklist and documentation package often leads to faster, more comparable bids and clearer warranty expectations. The next major section outlines risks of ignoring damage and why timely action matters.
Ignoring even small woodpecker holes creates direct pathways for moisture infiltration, exposes insulation and the WRB, and accelerates degradation through freeze-thaw cycles typical of the St. Albert climate. Once moisture enters the wall assembly, capillary action and thermal cycling can spread damage to adjacent substrate, promote mold growth behind finishes, and necessitate larger repairs such as insulation replacement, structural carpentry, or full panel replacement. The resulting remediation is often substantially more expensive than timely localized repairs, and prolonged exposure can affect indoor air quality and property value. Recognizing early signs — staining, soft spots, or new interior damp patches — enables faster intervention and reduces long-term costs.
Prompt repair and proofing protect both the building envelope and homeowner health, which is why inspection and fast action after initial pecking are strongly recommended.
Woodpecker holes breach the exterior finish and, if they penetrate the underlying insulation or water-resistive barrier, create direct channels for wind-driven rain, snow melt, and condensation to enter wall cavities. Once moisture reaches organic components or insulation, conditions favor microbial growth and rot; mold spores then find nutrients in damp insulation or sheathing and can proliferate behind finishes where they are hard to detect. Signs homeowners can detect include discoloration, bubbling paint, a musty odor inside, or soft substrate when probing around the hole. Early identification and drying/repair reduce the likelihood of mold remediation, which otherwise adds specialized costs and health-related concerns.
Prompt repair stops progressive deterioration by restoring the weather-resistant layer and preventing moisture entry before freeze-thaw cycles and thermal movement expand damage, which in St. Albert can occur quickly during seasonal transitions. Small holes that are repaired early typically require only patching and texture matching, whereas delayed repairs often demand substrate replacement, insulation drying, or structural carpentry—escalating labor, material, and access costs. Moreover, early intervention preserves curb appeal and reduces insurance risk related to concealed damage or mold claims, supporting property value retention. Routine inspection after the first repair also helps ensure prevention measures are effective, reducing recurrence and long-term maintenance expenditures.
A timely repair-and-proof approach therefore saves money and safeguards building envelope performance, leading into guidance on hiring qualified local repair specialists in the next section.
Prepare a prioritized checklist of questions to assess contractor competence, including inquiries about experience with EIFS, examples of similar repairs, itemized scope and materials, mesh embedment technique, and warranty length and coverage specifics. Ask contractors how they will test for moisture and verify the integrity of the WRB, whether they will replace insulation or sheathing when damp or soft, and how they will handle color and texture matching to minimize visual patches. Also request documentation of insurance and trade credentials, and ask for client references or local case photos that show long-term outcomes. Comparing responses across bids helps homeowners detect omissions or shortcuts that could lead to recurring damage.
Getting detailed written answers and photographic evidence prevents surprises and clarifies whether a quote truly includes required remediation steps. The next subsection explains how to interpret reviews and case studies.